In this post, learn what you are missing by neglecting image optimization techniques, along with tips on how to create SEO-friendly visuals for your posts and pages.
What is Image Optimization?
Image optimization is the process of editing visuals in regards to their size, format, and resolution to meet certain standards. Image (SEO) Optimization involves providing additional information to the search engine crawlers so they can identify your context and rank it higher for better visibility.
Now you may wonder how much traffic image search generates. Well, Google says this is an undisclosed number.
But we can confirm that image optimization will give you many more opportunities to attract visitors to your site.
According to Business Wire research, 62% of consumers prefer image search over any other medium. At the same time, when shopping online, more than 85% of consumers emphasize visuals rather than text.
And with Google’s algorithm getting smarter with each passing day – the potential for website engagement with image SEO is massive.

Unlike content SEO, image optimization doesn’t require countless hours of configuration. In fact, it doesn’t even call for the need for an SEO expert.
Simply by following a few easy steps, you can conveniently provide visitors with a better user experience and help Google define your visual content accurately.
So how do you optimize images for search?
Here’s the complete checklist.
1. Consider the Image Placement
Many website designers make the mistake of throwing in a picture or two in random places to break up the text. But doing this can confuse and distract the readers regarding your context.
When placing images on your webpage, try placing them near the most accompanying text to provide a reference to your topic.
Ideally, every web page should have a hero or featured image on top, as this is the area which the viewers will see right away when browsing your page. They will work as a ‘clickbait’ for the readers and encourage them to continue reading the particular web page.
Another point to remember is that the readers of today are just scanners. The majority of the viewers only skim through the content rather than reading every word. And they usually get bored and abandon the web page if hit by a wall of words.
To keep them interested and lower down your bounce rates, it is essential to add many different types of visuals. As a rule of thumb, it is considered a great practice to include one image at every scroll depth.
2. Ensure Relevant and Unique Content
Always be sure to add relevant and valuable photos to make your content more appealing and user-friendly. The best pictures are those that accurately represent your topic and integrate substance.
So, when picking out pictures, make sure to stay true to the topic at hand. You wouldn’t want to use a photo of a cute puppy for an article titled ‘Why Cats Are So Adorable.’ This will create a terrible user experience. It will also confuse the readers into thinking they are clicking on a wrong link or, worse – getting spammed.
Another thing to remember is to use unique images. According to John Mueller of Google, ‘using the same pictures as other sites won’t do good for your page’s visibility.’
As part of your SEO strategy, use only the photographs that are distinctive to your web page. Even if you buy stock pictures, don’t go for ones that appear in the first few result pages. Instead, search thoroughly and look for photos that are not replicating your competitors. You can also use the TinEye tool to configure the pictures that are already appearing online.
3. Select the Right File Format
Choose the right file format to ensure your pictures load seamlessly. But to decide the best format for your web page, you have to understand some of the popular options available.
- JPG: One of the most common formats, JPG files are better equipped to handle thousands of colors. They are generally used for pictures that are large and can scale to a minimum without losing quality.
- PNG: The PNG format supports a large palette of colors. They are also able to access semi-opaque options where backgrounds are transparent. They are ideal for flat photos, graphics, icons, and logos.
- GIF: The GIF format was initially designed for graphics but it’s mostly used for animated images on the internet.
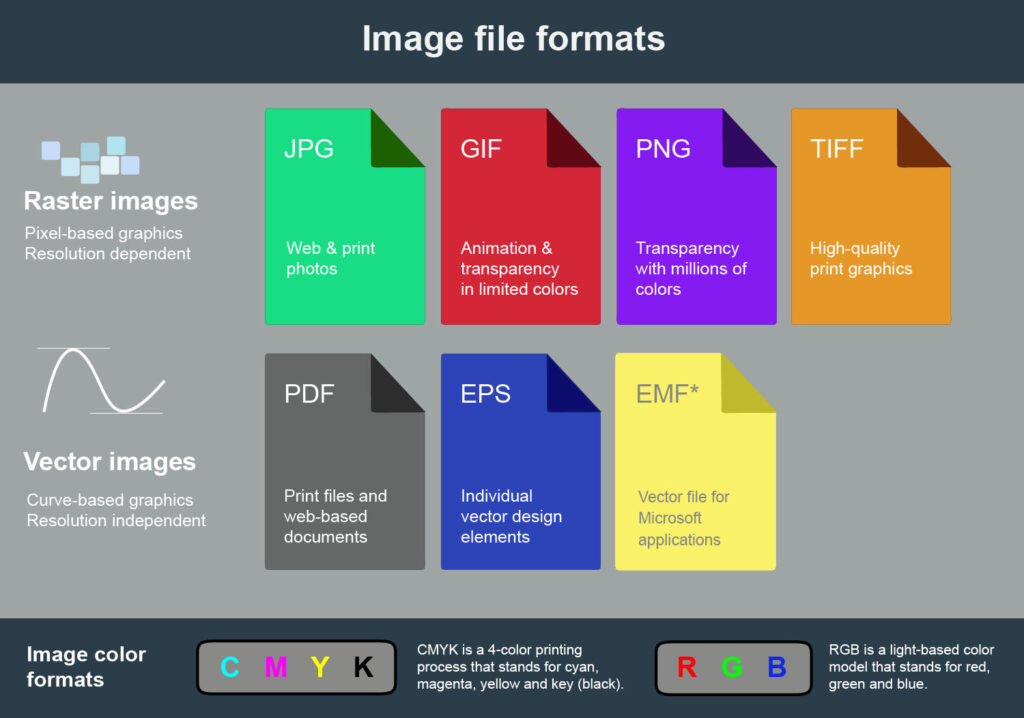
All the popular image formats have their own set of pros and cons. However, it’s advisable to keep a balance between image quality and size for ideal optimization. And thanks to next gen image formats this is now easier than ever.
4. Go for Mobile Friendliness
Mobile accounts for approximately 50% of all web traffic. In this case, it is natural to understand that you want your web pages (and images) to be mobile friendly and give ALL visitors a similar experience.
Generally, a combination of HTML, CSS, and JavaScript is utilized to make the pictures responsive regardless of the device.
But, the good thing is that most new sites are already mobile-friendly, courtesy of the Content Management System. However, if you are using an old site or unsure of the page’s capability, Google offers an easy test. With the help of this test, you can confirm if your website is optimized for mobile.
5. Pick the Right Resolution
While many web designers disregard this feature, it is important to showcase the best possible quality of your pictures.
If you have a small-size picture, enlarging it manually to fit your web page layout may result in a loss of clarity and coherence. To prevent this, employing image upscalers can effectively enhance image quality, preserving pixel information and presenting a sharp, high-resolution resource on your website.
At the same time, it’s as important to remember to avoid the exact opposite: to not include larger images than you should. For example, an original image can have a resolution of 2400×1080. But when you insert it, you see that the present resolution is too big. So you shouldn’t only scale it down on the editor – you should also do so on the file itself. Just because it looks smaller doesn’t mean that it is.
Speaking of which, here’s how to further decrease the file size.
6. Decrease the File Size
The images you use on your website consume more bytes than most other elements. This will eventually affect loading speed and impact the page’s performance.
According to a recent study, a one-second delay in page load can create a 7% drop in conversions. Approximately 40% of people will also abandon a page if it takes more than three seconds to load.
To ensure the same fate doesn’t happen to your website, make sure to use the lightest size available for your images.
There are several online tools such as Squoosh, TinyPNG, and ImageOptim to help you compress the weight of your pictures, so they load quickly. You can also use the ‘save for web’ option on Adobe Photoshop to automatically decrease file size without touching the quality.
Additionally, tools like a photo sharpener can help enhance image clarity, ensuring your visuals remain crisp and professional even after compression. These tools are excellent, as you can decrease the file size significantly without decreasing image quality at the same rate.
When compression is not sufficient to deliver an adequate size of images, consider using a CDN Network.
With this protocol, the pictures will be distributed to several servers spanning across the geographical network. They will then be delivered from the nearest server to the reader for quick loading.
You can also incorporate lazy loading to images and defer them until they need to be displayed. In simple terms, lazy loading will only load pictures when the visitor scrolls to their specific area.
7. Write Precise File Names
Writing descriptive file names to your images will help Google and humans better understand your site.
On the contrary, most web developers ignore this feature and continue loading images with default file names like ‘Image_740.jpg.’
However, search crawlers assess file names and find them helpful for ranking.
The best way to make sure your web page is correctly deciphered by Google is to name images appropriately. Be concise but descriptive when naming your picture files. It is also a good practice to add relevant keywords strategically for better visibility.
8. Use Alt Tags
The Alt Tags are displayed in place of your pictures if it fails to load for any reason. Also, the Alt Tags are helpful for visually impaired visitors using screen readers to understand your photos.
Like file names, make your Alt Tags specific, so they are comprehended easily by search engine crawlers and visitors.
For example, if you are using a picture of a cat sitting in a basket, avoid making the Alt Tag something generic like ‘cat.’ Instead, be descriptive and make the tag: ‘Ginger cat sitting in a basket.’
Image Optimization: The Takeaway
Image optimization is an essential SEO strategy to implement for better ranking on the search result pages. The visual branding you create for your page will highlight the quality of your webpage for the readers. So, make them as optimized as possible using the above tips.
Good Luck!

I write for GrowthRocks, one of the top growth hacking agencies. For some mysterious reason, I write on the internet yet I’m not a vegan, I don’t do yoga and I don’t drink smoothies.
